Monday, November 7, 2011

A great way to showcase your child's artwork

If you have kids, then you are inundated with artwork...not just any art, but their masterpieces! I have a hard time getting rid of stuff that my son has created, but I know it will begin to take over the house if I don't get it under control

I am IN LOVE with this idea from Jen at http://jengrantmorris.blogspot.com/.  She took her child's artwork, scanned it into photoshop and turned it black and white and then blew it up in size. Then she took fabric markers and traced them onto a duvet cover. Oh my goodness. How cute is this?


A custom duvet cover created by your child. 

Right now, Levi's drawings are mostly scribbles, but as he gets older and the artist in him starts coming out, I am SO going to do this! 


,What creative ways have you come up with to display your child's artwork?


Saturday, November 5, 2011

Dresser Turned Buffet: The finished product!

About a year ago, I purchased a dresser from a thrift store near my house.  As soon as I saw it, I could tell it was a good, solid piece of furniture and I loved the lines and the details of it! The best part was it was only $36!  I decided to turn it into a buffet for our kitchen area.  Several months ago, I painted it a bluish gray color but when I put it in our dining area, I wasn't crazy about the color against our walls. So it sat there for a while until a few weeks ago when I got a sudden burst of inspiration and decided to go bold and paint it peacock blue. I am SO glad I did! 

I KNOW I took a before picture but I can't find it anywhere on my computer, so I found a pic on google images that was very similar to the dresser I found at the thrift store:


I decided to take out the bottom 4 drawers and put paneling on the back and sides.  I filled in the holes on the top 2 drawers with wood filler and we drilled 1 hole in each.


Next, I painted it Peacock blue, then I sanded around the edges to give it a distressed look.  Then I painted the paneling a glossy white and added my Hobby Lobby knobs! Now, I have to find 2 matching baskets to put in the bottom!


I would LOVE to see your furniture redos! Post a comment with the link!


Canvas Giveaway WINNER!!


AND THE WINNER IS:

Drumroll please..............

Sweatpants Diva!!

Sweatpants Diva said...

I was married back in July and still haven't gotten any of our wedding photos printed! It would nice to have at least one piece of photographic proof!
October 19, 2011 9:24 AM
 
Congrats Sweatpants Diva!! I have sent you an email. Congrats on your new marriage too!
 
If anyone else would like to purchase one, email me at taylorgraydesigns@gmail.com and I will give you my pricing.
 

Thursday, November 3, 2011

Trendspotting: BIRCH

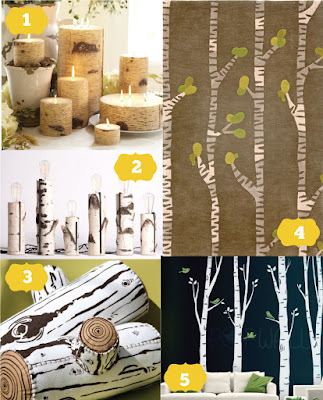
Everywhere I look these days, I am seeing birch.  I love using natural textures inside the home.  


1.  Birch Candles from Pottery Barn 
2.  Autumn Workshop's touch lamps from inhabitat.com are made from repurposed birch log pieces.
3.  Birch Pillows sold on Etsy {no longer available}
4.  Birch hand tufted wool rug by Angela Adams
5.  Tall Birch Trees with Flying Birds--art wall sticker wall decal


A little more affordable Birch Candles from World Market


Don't get me wrong, I LOVE you Pottery Barn, but I am NOT paying $55 for a candle! I don't care how pretty it is, it's still a candle. Especially, when you can make one just like it yourself!  So my next project is going to be making some birch candles of my own.


I saw this adorable project with tutorial on Martha Stewart.com which gave me some inspiration.  {How cute are those little birds??}


It's just birch paper wrapped around toilet paper rolls...AND the birch paper can be downladed free here!

Also, here's a link to a free birch graphic thats a larger scale that you could wrap around some candles to mimic the Pottery Barn look.

I can't wait to make some of these! I'll post them as soon as I get them done!!

Tuesday, November 1, 2011

3 Thanksgiving DIY projects

Now that Halloween is officially over, it's time to start decorating the house for Thanksgiving! I have been searching through Pinterest for some fun {cheap} DIY ideas and here are 3 of the best that I have found so far:

1.  Thanksgiving Centerpiece


You could use pumpkins that you already have from Halloween, paint them white and add the vinyl letters. This would be great for a mantle too using the little mini pumpkins.  I love how they are all stacked at different heights. VERY CUTE!  The link is found here.

2.  Thankful Subway Sign
I am totally IN LOVE with all the subway art out there. I love typography as an art form and I think these are a great way to personalize your home decor.  I think this one is a great reminder of all the little things that we take for granted.  I found this on Pinterest and it didn't link back to anything, so I don't know where to give credit.  I WILL be making this!

3.  Twigs and Candles


I love incorporating nature with the indoors. This project found here would cost nothing to make.  Just hot glue branches to votives that you already have. 

I'm totally inspired now to start my Thanksgiving decorating! Thank you Pinterest for giving me SOOOOO many ideas!!